Where do you find inspirations for your craft creations? Well, I find inspirations for creating my cards everywhere... flowers, trees, people, everyday life, etc. A week or two before the Fourth of July, I found the inspiration for the cards in today's blog post!
Can you guess what it is?!?!
Here's the inspiration!!! I spied this t-shirt for my son to celebrate the Fourth of July none other than at our local marketplace grocery. My mind was overflowing with card ideas before I could get it in the shopping cart!
Can you guess what it is?!?!
Here's the inspiration!!! I spied this t-shirt for my son to celebrate the Fourth of July none other than at our local marketplace grocery. My mind was overflowing with card ideas before I could get it in the shopping cart!
Thanks to the popularity of my favorite HGTV show, Fixer Upper, it seems that everywhere I turn, there are DYI ideas for the farmhouse look. I found a repurposed old window at a recent Vintage Flea Market that I didn't have to anything to... yet. Isn't it a fun way for displaying cards? I thought so, but just wait until you see the bottom half of the window! You'll have to wait for another blog post to see that.
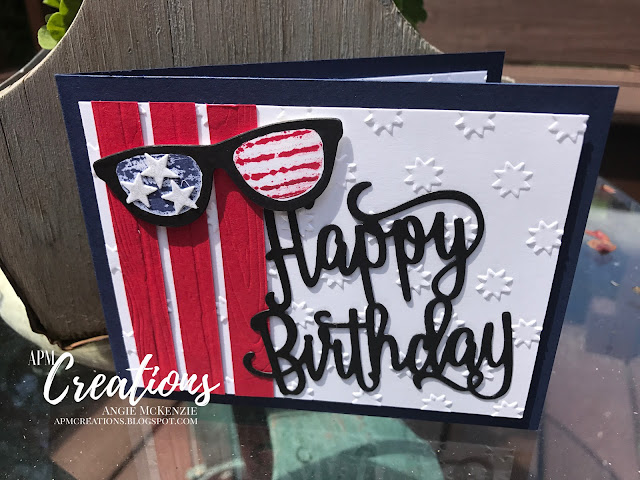
The sunglasses were so much fun to create... and the most time consuming, but they were definitely worth the time and effort for the three special RAK friends who will receive them. I used the Pocket Framelits die to cutout the frames from Thick Whisper White cardstock. The photopolymer stamp image was outlined with Basic Black Stampin' Write Marker and then the lens were colored with Night of Navy and Real Red Stamping' Write Markers. The "huff and puff" technique was used before I carefully placed the stamped image down on the cutout. The frames were then colored with a Basic Black Stampin' Write Marker. The finishing touch was to run the Basic Black Stampin' Write Marker along the edge of the frames.
The stars are from the Mini Treat Bag Framelits and accented with Clear Wink of Stella for a sparkle effect.
Real Red cardstock was ran through my Big Shot with the new Pinewood Planks Dynamic Textured Impressions Embossing Folder (DTIEF) and then trimmed to the desired width to mimic our American Flag. The Oh My Stars TIEF and the Pinewood Planks DTIEF were used for the card front backgrounds and to make borders for the insides of the cards.
Basic Black cardstock and the Happy Birthday Thinlet die created the fun sentiment which was adhered with Tombow Multi-Purpose Adhesive across the card fronts for the perfect placemat.
 |
Stars & Stripes Patriotic Card
Images © Stampin' Up!
|
 |
| Patriotic "Wood Pallet" Birthday Card Images © Stampin' Up! |
 |
| Patriotic "Banner" Flag Birthday Card |
And don't forget that the insides of your cards are just as important as the outside! You need to make sure that you have plenty of space to let the recipient know how important they are to you... after all, isn't a handmade card a hug with a fold in the middle?!
I hope these cards have inspired you to get busy creating and making others smile!
Happy crafting!
Happy crafting!
-Angie xx
Card Recipes
Stamps: Pocketful of Sunshine; Beautiful You and Happy Birthday Gorgeous (non-photographed inside sentiments)
Inks: Archival Basic Black, Night of Navy
Papers: Thick Whisper White, Real Red, Night of Navy, Basic Black and Whisper White yardsticks
Papers: Thick Whisper White, Real Red, Night of Navy, Basic Black and Whisper White yardsticks
Other: Pocketful of Sunshine bundle; Real Red, Night of Navy and Basic Black Stampin' Write Markers; Mini Treat Bag Thinlits dies; Clear Wink of Stella; Happy Birthday Thinlits die; Oh My Stars Textured Impressions Embossing Folder; Pinewood Planks Dynamic Textured Impressions Embossing Folder; Big Shot; Standard Cutting Plates; Magnetic Platform; Standard Platform; Spritzer; Stampin' Dimensionals; Snail Adhesive; Tombow Multi-Purpose Adhesive


No comments
Post a Comment
Thanks so much for taking the time to post a comment. Your comments make me smile!